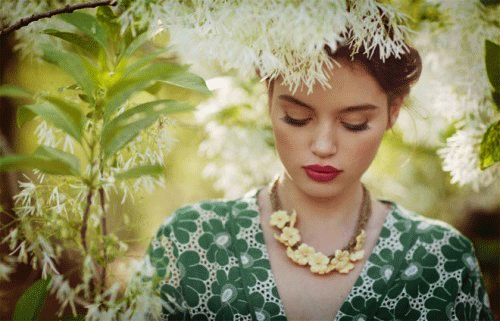
Learn how to create a vignette photo effect in Photoshop with these simple steps. ♥
1. Open Image in Photoshop
+Open+Image.PNG)
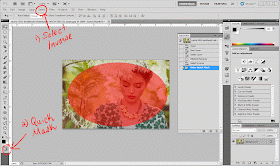
2. Select the Elliptical Marquee tool (if it isn’t visible, click and hold the marquee icon which will show a menu of options, including the Elliptical Marquee) and draw an oval shape around the center area of your photo. (Any area you don’t select is going to be shaded.)
+Elliptical-Selection-Tool.gif)
3. Next choose “Select > Select Inverse” in the top Menu. Then enter “Quick Mask” mode by clicking the camera icon on the bottom left.
+Select-Inverse-then-Enter-Quick-Mask.gif)
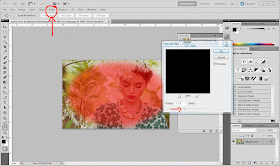
4. On the top menu bar, select “Filter > Blur > Gaussian Blur.” A menu box will appear where you can make your adjustments. The more blur you add, the more smooth the transition of light to dark will be in your vignette. Exit Gaussian Blur (click “Ok”) and Quick Mask (Click the camera icon again) when you’re done. (The edges should already be selected when you exit “Quick Mask.”)
+Gaussian-Blur.gif)
5. At the top menu again, select “Image > Adjustments > Levels.” In your Levels box, use the top center arrow to darken the outside of the image, making your vignette. Moving the slider to the right will darken the edges, and moving it to the left will lighten it. Make sure “Preview” at the bottom right of your Levels box is selected so you can see what your image will look like.
+Adjust-Levels.gif)
6. Hit “Ok”and Deselect the image (“Select > Deselect” or Ctrl + D) and you’re done! Enjoy you’re beautiful vignette image.

Before & After

xo,
Ruche
I love this effect! Thanks for showing it!!!
ReplyDeletexoxo
Valens
Cool effect, thanks!
ReplyDeleteHauteStandards
So pretty!
ReplyDeleteThanks for sharing!
http://www.ahopelessnotebook.blogspot.com/
I am obsessed with vignettes! Thank you so much for this tutorial. I usually just do filter - distort- then lens correction, but this one is nice because you have more options as to how/where you can place the vignette!
ReplyDeleteBeautiful picture!
ReplyDeletehttp://babybakerlove.blogspot.com/
Lovely!
ReplyDeleteMarie @
Lemondrop ViNtAge
So obsessed with Ruche!! Hope you'll follow back! ;)
ReplyDeletewww.styledsealeddelivered.blogspot.com
Beautiful
ReplyDeleteI am completely in love with Ruche, and greatly admire your photography/imaging skills! It's a dream I have to come and work with you guys for a brief period, that would be amazing ;)
ReplyDeleteKeep up the awesome work.
Jo Spencer
www.joanne-spencer.co.uk
http://joanne-spencer.blogspot.com/
they also have an "edit vignette" option. a bit easier!
ReplyDeletego to Filter --> Lens Correction --> Custom.
You can edit the darkness of the vignette and where the midpoint is.